7. Sales e-mail settings
If you would like to use Dynamics GP to send e-mail to customers, you will need to set up Sales E-mail options.
Navigate to Microsoft Dynamics GP | Tools | Setup | Sales | E-mail Settings. The Sales E-mail Setup
window controls e-mail settings for both the Receivables and Sales
Order Processing modules. You only need to enable e-mailing for
documents you are using and these can be changed at any time.
Select the checkbox next to each document type that you would like to e-mail and choose a Message ID
for each. Messages allow you to predefine the subject and text of the
e-mail that will be generated by Dynamics GP. You can set up a new
message by typing in a Message ID and answering Yes to the pop-up window asking if you would like to add this Message ID, or by navigating to Microsoft Dynamics GP | Tools | Setup | Company | E-mail Message Setup.
On the Message Setup window:
Specify a Message ID—maximum length is 25 characters.
Enter a Description—up to 150 characters.
Choose Sales under Series.
Enter a Subject and a Body for your message. The Subject can be up to 150 characters, the Body will allow up to 32,000 characters.
Have Replies Sent to will default from the Sales E-mail Setup window, but can be changed for each individual message.
Back on the Sales E-mail Setup window, you can enter where to have replies sent to. Clicking on the Select Names
button will open your Outlook Address Book, or you can type in the
e-mail addresses separated by semicolons. You can also select whether to
Allow Changing 'Reply to' Address at Entry and Allow Update of E-mail at Entry of transactions.
Clicking on the Customer Setup
button at the bottom will open the customer navigation list showing all
your customers. You can search and filter your customers, then click on
the overflow button (>>) in the Modify section, and choose E-mail Settings:
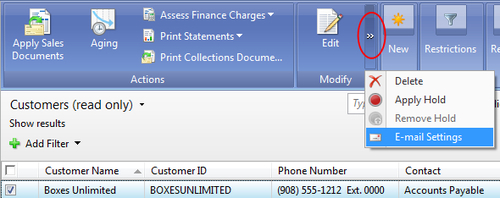
This will open the Mass Customer E-mail Settings
window, where you can define e-mail settings for all the customers you
selected on the navigation list. These settings can also be changed
individually for every customer.
8. Customers
The final step in the Receivables module setup in
Dynamics GP is creating customers. If you have many customers, you may
decide to import them; however, it is still valuable to know how to set
up or change customers manually. Creating a customer includes customer
setup, customer accounts, customer options, and customer e-mail
settings.
Customer setup
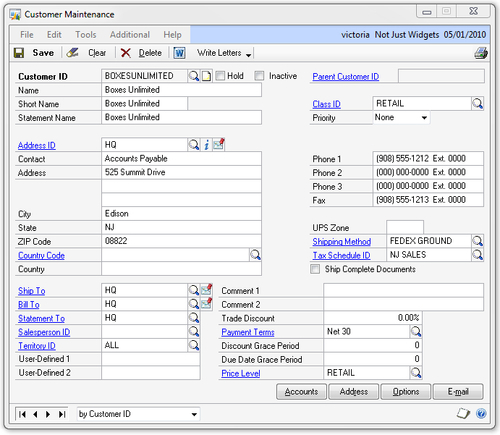
To create or change a customer, navigate to Cards | Sales | Customer. The following list explains the fields on the Customer Maintenance window. Please note that some of these fields have already been explained in detail in the Customer classes section:
Customer ID: This is the ID that will be used to identify the customer throughout Dynamics GP and it can be up to 15 characters.
Hold: A customer can be put on hold
at any time. You can enter payments or apply existing payments for a
customer that is on hold, but cannot enter any other sales transactions.
If a password was set up for Remove Customer Hold on the Receivables Management Setup
window, then users will need to enter that password before being able
to enter any sales transaction other than a payment for a customer on
hold. If no password is set up, the user will get a warning, which they
can click through, when entering a transaction for a customer on hold.
Inactive: Any customer with no open balance or unposted transactions can be set to Inactive.
No transactions can be entered for inactive customers. This option is
used when you stop working with a customer and want to prevent users
from inadvertently choosing the customer on a transaction, or you want
to be able to exclude them from searches.
Name: The name that will appear for
the customer throughout Dynamics GP. This is the name that will default
on customer invoices and other reports.
Short Name: This field is not really used by the application and will default to the first 15 characters of the Name.
Statement Name: This is the customer
name that will default on statements printed from Dynamics GP. When
setting up a customer, this will default to be the same as the Name.
Address ID section: The address on the Customer Maintenance window is typically the primary address for the customer. Additional addresses for the customer can be entered by clicking the Address button at the bottom of the window.
|
Even though there are three lines available for the
Address, only the first two lines will appear on any out-of-the-box
report in Dynamics GP. Reports would need to be customized to show the
third address line.
|
|
Ship To: This Address ID will default as the Ship To address on all transactions for the customer.
Bill To: This Address ID will default as the Bill To address on all transactions for the customer.
Statement To: This Address ID will default as the address on the customer statement.
Salesperson ID: This is the primary
salesperson for the customer. If there is a salesperson in charge of the
customer, you can enter their ID here. If the salesperson changes on
every transaction, it may be best to leave this blank. If the
salesperson depends on the shipping address, you can add the Salesperson
ID to each individual address you set up for the customer.
Territory ID: If you have entered a
Salesperson ID, the Territory ID assigned to that salesperson will
default in. This is simply to speed up data entry, you can change the
Territory ID as needed.
User-Defined 1 and User-Defined 2:
These fields can track any additional information you would like for
the customer. Each can store up to 20 characters and their labels can be
changed on the Receivables Management Setup window (Microsoft Dynamics GP | Tools | Setup | Sales | Receivables | Options).
|
The User-Defined 1 field can be used as a filter on the Receivables Trial Balance reports in Dynamics GP.
|
|
Parent Customer ID: This field is used by the National Accounts module and is not editable on the Customer Maintenance window.
Class ID: Select the Class ID for
this customer. Class IDs are optional, but they can speed up setup and
simplify reporting. When a class is selected, all settings from that
class will populate for this customer. While creating a new customer,
any of the settings that have already been selected manually will be
overwritten with settings from the class. For existing customers, a pop
up message will ask whether you want to update the customer settings
with the information from the class.
Priority: Optionally select a priority for this customer.
Phone and Fax
numbers: Enter any phone or fax numbers you want to track for the
customer. Note that the fields are hard coded for the North American
phone format with a four-digit extension. For international phone
numbers or longer extensions, many companies use the Comment 1 and Comment 2 fields or the customer note.
UPS Zone: Not too many companies need to track the UPS zone anymore, but many use this field to store an R for residential or C
for commercial addresses, which may be needed by various shipping
software. This field is specific to the primary address on this window
and each customer Address ID will have its own UPS Zone field.
Shipping Method: Select the default
Shipping Method ID for the customer's primary address. Each customer
address has its own shipping method which can be changed during
transaction entry.
Tax Schedule ID: This is the Tax
Schedule ID for the primary customer address on this window. Each
address can have a different Tax Schedule ID assigned and the taxes can
be changed manually on each transaction.
Ship Complete Documents: This
checkbox is for the Sales Order Processing module. If selected,
partially filled orders will not transfer to invoices for this customer.
This setting can be overridden on each individual Sales Order
Processing transaction.
Comment 1 and Comment 2: These are additional fields available to track information about a customer. They can store up to 30 characters each.
Trade Discount: Enter a default trade discount percentage for the customer.
Payment Terms: Enter the default payment terms for the customer.
Discount Grace Period and Due Date Grace Period: These work together with the Use Customer/Vendor Grace Periods for Date/EOM Payment Terms option on the Payment Terms Setup window. You can enter up to 99 days for each of these settings.
Price Level: Enter the default price level for the customer—this will be used in the Sales Order Processing module.
The following is an example of the Customer Maintenance window:
Customer accounts
Clicking the Accounts button at the bottom of the Customer Maintenance window will open the Customer Account Maintenance
window, where you can set up any GL accounts that are specific to this
customer. While account numbers can be changed during transaction entry,
it is recommended to have as many accounts as possible default on
transactions so that Dynamics GP users do not need to change or add GL
distributions manually.
The accounts on the Customer Account Maintenance
window will be the first ones Dynamics GP looks to use for any sales
transactions. If any accounts are not set up, the posting accounts for
the company will be used (Microsoft Dynamics GP | Tools | Setup | Posting | Posting Accounts).
For any customer assigned to a customer class, the accounts on the Customer Account Maintenance
window will default from the class settings. If an account for all
customers in a class needs to be changed, the change can be made to the
class and then rolled down to all customers in that class.
Customer options
To open the Customer Maintenance Options window, click the Options button at the bottom of the Customer Maintenance window. Many of the settings on this window are also found on the Customer Class Setup
window and will all default in when a customer is assigned a Class ID.
Any of these settings can be changed for an individual customer.
New fields on the Customer Maintenance Options window are:
Credit Card ID: If credit cards are
used for payment by this customer, you can enter a Credit Card ID that
will default onto payment transactions entered for this customer.
Credit Card Number: Anything entered here is stored in plain text, so it is not recommended to enter credit card numbers in this field.
Expiration Date: Expiration date for the credit card entered above.
Bank Name and Bank Branch: These can store the customer's bank and branch—these are not typically used.
Language: This is an informational field that becomes available if you have set up languages for your Dynamics GP system (Microsoft Dynamics GP | Tools | Setup | System | Language).
Tax Exempt 1, Tax Exempt 2, and Tax Registration: If you need to track tax exemption numbers for customers, they can be entered in any of these three fields.
Send E-mail Statements: If you are
going to use the Dynamics GP built-in routine for sending customer
statements, check this box for any customer that should be included when
sending statements. Clicking on the To, Cc, and Bcc
buttons will open your Outlook Address Book to allow you to select
contacts for each. Alternatively, you can enter e-mail addresses
separated by semicolons.
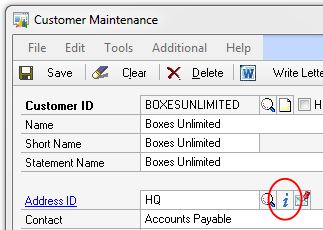
Customer e-mail settings
To enable e-mailing documents other than statements
to customers, first set up e-mail addresses for the customer by clicking
on the Internet Information icon to the right of the Address ID:
Clicking the To, Cc, and Bcc buttons on the Internet Information
window will open your Outlook Address Book, where you can choose from
your contacts, or you can type in e-mail addresses separated by a
semicolon. Every Address ID can have a separate set of e-mail addresses
set up.
To set up e-mail options for the customer, click on the E-mail button at the bottom of the Customer Maintenance window. This will open the Customer E-mail Options window where you can decide on Attachment Options and Size, enable what Forms (documents) can be e-mailed to this customer, and choose a Format for each. When Forms are enabled, the Message ID from the Sales E-mail Setup window will default in. Note that only the HTLM Format
will work for sending Dynamics GP standard Report Writer reports. To
use any of the other formats requires setting up Word templates for
Dynamics GP.
With the Receivables module setup completed and customers created, receivables transactions can now be entered into Dynamics GP.